Overview
The Dialogic Brooktrout SR140 is a software-only Fax over IP (FoIP) solution from Dialogic. Installation instructions are provided in this article.
Environment
Any FaxMaker installation using a Brooktrout SR140 fax device. To use the Brooktrout SR140 (FoIP) software, you must have both a license from Dialogic Technology, activated as outlined below and a GFI FaxMaker license key that is enabled for Brooktrout SR140 usage. To obtain an SR140 usage license from GFI, submit a request via the GFI Customer Care Center or contact your reseller.
Solution
The solution has several processes which include:
-
Installing the driver
-
Activating the license
-
Configuring the SR140 settings
- Configuring the FaxMaker lines
Installing the Driver
It is recommended to disable UAC. If UAC is not disabled you will need to right-click each file and select run as administrator or there will be an error opening the tool or an issue saving.
- Click on Start > All Programs > GFI FaxMaker > GFI FaxMaker Configuration Wizard.
- On the Welcome page, click Next to continue (Note: The wizard stops the GFI FaxMaker Fax Server Service and the GFI FaxMaker Message Transfer Agent Service).
- Click Next to continue once the services are both stopped.
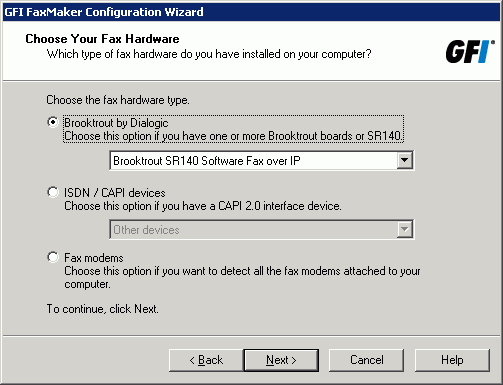
- When you get to the Choose Your Fax Hardware screen, select Brooktrout by Dialogic and select Brooktrout SR140 Software Fax over IP. Click Next to continue.
- The wizard asks you whether you want to run the GFI FaxMaker Brooktrout TR1034 (Boston) / SR140 driver setup. Click Yes to start the driver setup wizard.
Note: The Brooktrout TR1034 (Boston) / SR140 driver setup contains drivers that are made by Dialogic, however, Dialogic relies on vendors to distribute them. - Setup starts by checking if there is any Brooktrout software already installed on the machine. Should it be the case, uninstall any existing Brooktrout software using the Add/remove programs from the Control Panel. After all Brooktrout software has been uninstalled, restart the Brooktrout setup.
- In the setup wizard Welcome page, click Next to continue. On the End User License Agreement page, click I accept the agreement and then click Next to continue the installation.
- At this stage, you can specify the installation path of the TR1034 drivers. By default, the installation path is set to the same path where GFI FaxMaker is installed. We recommend that you install to this default location, but if you want to change the default installation path, click Browse and specify the required path. To continue with the installation, click Next.
- On the Ready to Install page, click Install.
- On the Finish page, clear the Run Brooktrout configuration tool checkbox and then click Finish to close the GFI FaxMaker Brooktrout TR1034 Drivers wizard and complete the installation.
Activating the License
You now need to activate the license for Brooktrout SR140. The license is a 12-digit number that is sent to you by GFI. You must activate the license with Dialogic first following the steps below.
The license activation can be done from the Brooktrout License Manager.
- Go to All Programs > GFI FaxMaker Brooktrout TR1034 Drivers > Brooktrout License Manager. Right-click and select run as administrator.
- From the top ribbon bar select Activate.
- On the Welcome screen, select Next.
- Select the Activation Method to use:
- Automatically: Select this method if the computer is connected to the internet to automatically activate the license key. This is the easiest method.
- Using the interactive web method: If the computer is not connected to the internet, select this method and proceed on the next page select save the instructions to file and proceed to the Dialogic webpage to complete the activation.
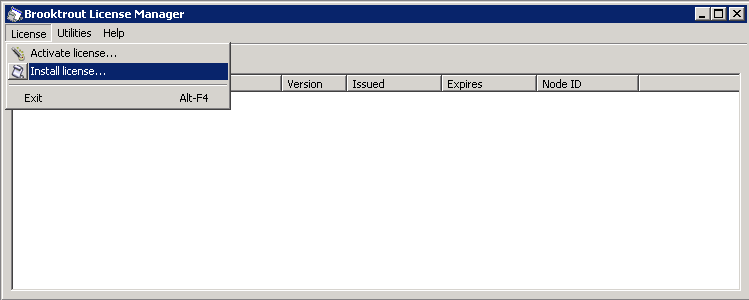
- You can also select to Create a request for email or fax and follow the instructions in the wizard (takes longer to activate the SR140 license key). Once you receive the .lic file, select to Install License (as shown in Figure 3), and select the .lic file received from Dialogic.
- Once the license file has been obtained, select Install and navigate to the correct .lic file and select it.
- The Brooktrout License Manager now displays the details of the license key you provided. To close the Brooktrout License Manager, click Exit from the License menu.
- Determine whether you have a valid SR140 license and GFI usage license both from Dialogic Technology and GFI. Use the Fax Lines do not Initialize in the FaxMaker Monitor When Using Brooktrout SR140 article to verify this.

Configuring the Brooktrout SR140 Settings
You now need to configure the Brooktrout SR140 settings from the Brooktrout Configuration Tool. This is where you will set the correct IP addresses and port numbers to be used
- From Programs, open the Brooktrout Configuration Tool by right-clicking and run as administrator.
- If the Brooktrout Configuration Wizard appears, select the advanced mode button on the bottom left.
- If the Brooktrout Configuration Tool preferences box appears, select OK.
- If this is the first time running the tool, you will be asked to configure your IP stack. Select SIP or H.323, depending on the configuration you will be using.
- Once selected, under IP Call Control Modules will be the stack selected. Select this and enter the settings required on the IP Parameters, T.38 Parameters and the RTP Parameters tabs.
- If you need configuration assistance, you can refer to the help included in the configuration tool.
- Once complete, click on the Save and then the Apply icons in the toolbar and then close the Brooktrout Configuration Tool. This applies the settings and starts the Boston Host Service.
Configuring the FaxMaker Lines
- Now you need to configure the GFI FaxMaker lines that will be associated with the Brooktrout SR140 (FoIP). To do so, from the GFI FaxMaker Configuration Wizard click Configure lines. For more information, refer to Adding New Fax Lines.
- Continue through the GFI FaxMaker Configuration Wizard to start the GFI FaxMaker Fax Server Service and the GFI FaxMaker Message Transfer Agent Service.
- On the Finish page, click Finish to close and complete the GFI FaxMaker Configuration Wizard.
Confirmation
Once completed, verify the proper operation of the setup by sending a fax using your preferred sending method. Log into the FaxMaker Web Interface and verify the faxing is working by using the FaxMaker Monitor.
Priyanka Bhotika
Comments