Overview
This article explains how to configure a FaxMaker routing rule (DID for example) to send a fax to a network shared folder. This will use the Backup2Folder tab on the routing rule.
Solution
Follow the steps below to configure a network shared folder for inbound DID route faxes:
- Ensure the routing rule has been created. Follow the Configuring DID/DTMF Routing article.
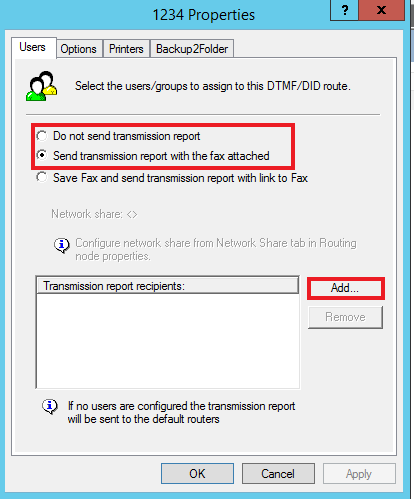
- Once the route is created, select the Users tab. The top two options are highlighted and explained below.
- The first option will not send a transmission report to the user listed in the Transmission report recipients box. If there is no user listed, a text file will not be dropped into the network share folder listed on the Baxkup2Folder tab along with the fax information file.
- The second option will send a transmission report to the user listed in the Transmission report recipients box. If there is no user listed, a text file will be dropped into the network share folder listed on the Baxkup2Folder tab along with the fax information file.
- The Add button is there to add a user to the Transmission report recipients.
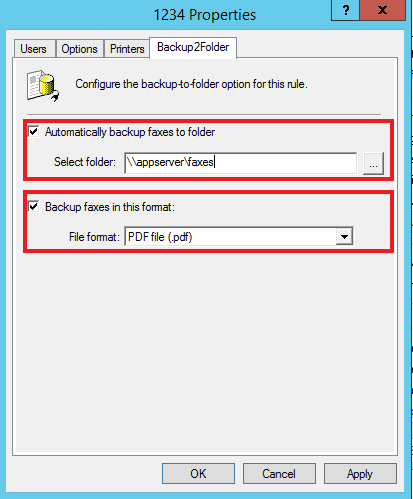
- Next, select the Backup2Folder tab.
- Select the "Automatically backup faxes to folder" checkbox and in the select folder box, enter the UNC path.
Note: Ensure the FaxMaker Fax Server service has write level access to this folder. To test this, log into the fax server as the FaxMaker Fax Server service account and attempt to access the shared folder using the same path entered into the routing rule of the FaxMaker Configuration. Ensure no popups requesting credentials appear when accessing.
The FaxMaker Fax Server service account can be located here:
Right-click the Start button and type Run
Type services.msc and select OK Right-click the FaxMaker Fax Server service and select properties
Select the Log On tab and the service account will be listed there
Leave the Services MMC open until completion of adding or editing the routing rules - Select the "Backup faxes in this format" checkbox and select the file format you would like to have the faxes saved.
- Select OK on the routing rule properties box
- Select the "Automatically backup faxes to folder" checkbox and in the select folder box, enter the UNC path.
- Close the FaxMaker Configuration
- Restart the FaxMaker Fax Server service. (Right-click and select restart)
- The first option will not send a transmission report to the user listed in the Transmission report recipients box. If there is no user listed, a text file will not be dropped into the network share folder listed on the Baxkup2Folder tab along with the fax information file.
Conclusion
Once the service has been restarted, test with inbound faxes that match the altered or newly created routing rule to ensure they arrive in the intended destination.
Priyanka Bhotika
Comments